Quick explanation and example on how to use Power Automate to collect PowerShell script output/logs.
Intro
When using PowerShell script deployed via GPO or Intune it can be a bit annoying to gather the exact results or script output. This is where you can use Power Automate, with Power Automate you can do a lot of things with your script output but in this example we will save the result in a Sharepoint List which gives us a clear view of all the executions of our script.
Requirements
- A Power Automate Premium license (90 day trial is available)
NOTE: My flow kept working after my 90 day trial expired but you are not able to create new flows with this trigger
Creating the Flow
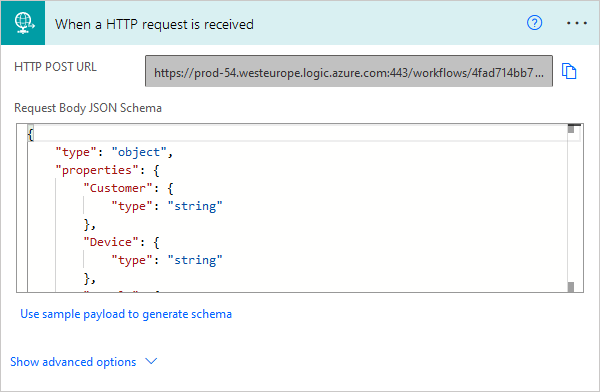
Create a new Flow as the trigger use When a HTTP request is received, under the advanced options set the method to POST as we are posting data to the Flow.
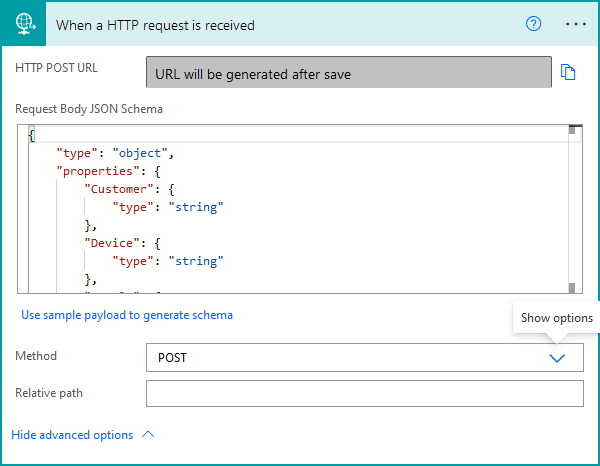
We will set the Request Body JSON Schema to:
{
    "type": "object",
    "properties": {
        "Customer": {
            "type": "string"
        },
        "Device": {
            "type": "string"
        },
        "Result": {
            "type": "string"
        },
        "LogFile": {
            "type": "string"
        }
    }
}
In this example we will collect the following properties from our Powershell script:
- Customer
- Device
- Result
- LogFile
We send the LogFile in String format because we will base64 encode the logfile with Powershell and decode it again in our Flow, this is because the Flow trigger does not support receiving files.
We will also initialize a variable with the value of the current date and time:

The next step in our Flow will be to save the data to a SharePoint List, but before we can do that we need to create the list. In our list we will add the following columns:
| Column Name | Column Type |
|---|---|
| Customer | Text |
| Device | Text |
| Result | Text |
| LogFile | HyperLink |
| Date | Date (including Time) |
You should also create a Document Library where the logfiles will be saved.
Back to our Flow we will add a new Compose action:

NOTE: In this example we use a .txt file, if you want to use other file types replace the content-type to the one corresponding with the file extension. See link
Next we will save the file to the Document Library we created earlier:
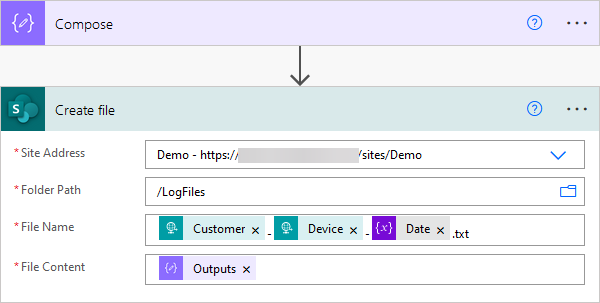
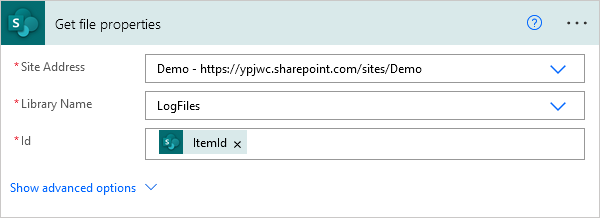
In our Sharepoint List we want to link to the LogFile we uploaded. To get the URL we will need to get the file properties via:
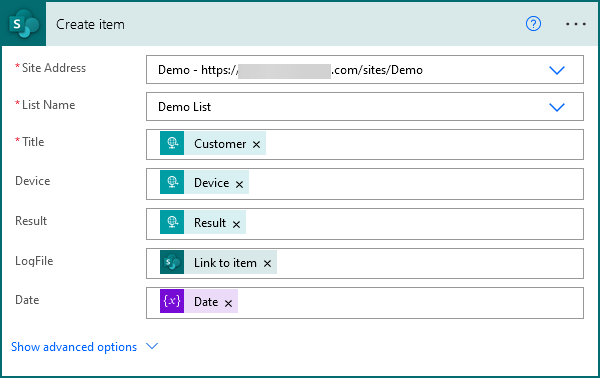
And the last step in our Flow is to create a list item:
Creating our PowerShell script
Here is an really basic example script:
Start-Transcript -Path ".\LogFile.txt" -NoClobber

# YOUR
# SCRIPT
# HERE
# $result should be defined in here!!

Stop-Transcript

# The URI generated by the Power Automate Flow
$URI = "https://prod-230.westeurope.logic.azure.com:443/workflows/xxxxxxxxxxx"
# Setting our customer name
$customer = "customer name"
# Setting the $device variable equal to the current device name
$device = $env:computername
# Converting our LogFile to a base64 string
$logfile = [convert]::ToBase64String((Get-Content -path ".\LogFile.txt" -Encoding byte))
# Remove LogFile as we won't need it on the system any longer.
Remove-Item -Path ".\LogFile.txt"

# Composing the request body
$body = ConvertTo-JSON @{
    Customer = $customer
    Device = $device;
    Result = $result;
    LogFile = $logfile
}
# Triggering Flow to register results to
Invoke-RestMethod -uri $URI -Method Post -body $body -ContentType 'application/json'
You can get the URL from your Flow after saving it:
After we execute the script you will see a new item added to our list:

You will also see the logfile is uploaded to the folder:

The script used is very simple but you can use this in a lot of different ways. The Sharepoint list will also allow you to easily sort by customer/device/result.
The LogFile gives you insight on what errors occured within the script output.